In this post, I’ll teach you how to create Google Analytics events for outbound link clicks happening on your website. This will allow you to track specific conversions in Google Analytics (GA), for instance affiliate clicks, or visits to your main landing page from your blog. To get the whole analytics setup in place, I will show you how to use Google Tag Manager (GTM). By doing so you will avoid wasting time on your server and you will avoid the risk of breaking your website appearance.
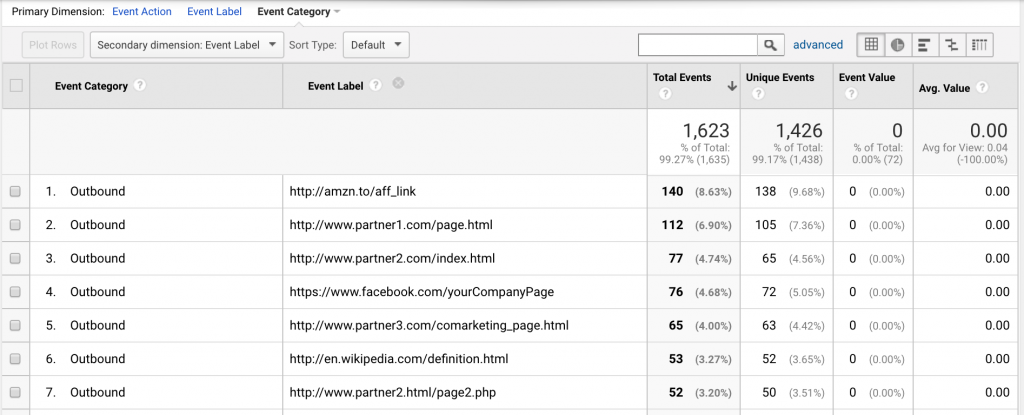
What we will end up doing here is creating events in Google Analytics via Google Tag Manager. Here is what it will look like in real life:
Use Cases
Tracking outbound links might be especially interesting in a bunch of cases.Most of them depend on the purpose of your website.
Clicks to a landing page (content marketing): If you are doing content marketing, chances are that you write on a blog to generate traffic to a landing page. This is the case of this page. I’m writing this tutorial to attract readers who might be interested in trying Repost (see the link somewhere in this page?). When you are the blog manager, you want to track clicks to your landing page to confirm you are not wasting your time writing this new series of posts your CMO suggested. If you generate views, but no one click one your target link, your efforts are useless.
Tracking affiliate links (revenue-generating blog): If your blog was created to generate passive income, you are probably writing blog posts about products and using affiliate links to earn some money. Affiliate links might come directly from a vendor (like Amazon) or from an Affiliation platform. In some cases, you will use a link tracker tool (bit.ly, clickmeter) to hide the final link. But generally you want to retrieve all your stats in Google Analytics to know which articles generate more affiliate traffic. That will also help to get your own independent stats.
User-Generated Content (forums, job boards, classified ads, …): When you are not the one who produces the content, it might be important to track the popularity of link posted by your users. It might help you for a potential partnership. Say that your users create a viral thread about product X from brand Y. If your analytics show that your traffic generated 2K clicks this week, you might want to outreach the marketing department at Y to leverage this popularity by setting up a paid campaign on your website.
Co-branding (guest posts): When you invite people to write on your site, it might be great to provide them numbers. If you can tell them that their post generated 400 clicks to their site, it’s better than just saying that their post generated 3K views.
… you’ll always find a great application.
1 – Initial GTM Setup
The nice thing here, is that you only need one script on your website: Google Tag Manager. This tool provided by Google, is what people call a “Tag Manager System” (pretty transparent, right?). Tag Manager Systems (TMS) help medium and big companies to have a separation of concerns when it comes to adding marketing tags on websites. Instead of asking the IT to insert a new JS tag in your page, you can just ask for an access to the TMS and you’ll be free to insert javascript and do some advanced configuration. We’re not going into advanced applications in this post, but if you want to learn about GTM, I suggest you to read Simo Ahava’s blog. , (also LunaMetrics blog is full of gems).
Get an account and create a container
GTM is well connected to the Google marketing apps suite. You probably already have a Gmail + Google analytics account if you are reading this article, so creating a GTM account will be really easy.
When you are in, GTM will ask you to create an “Account”, here, I suggest you to enter the name of the company you work for, or the name of the project you are working on.
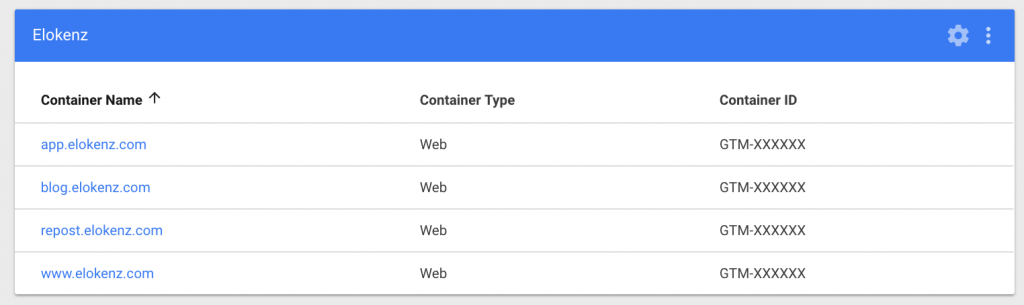
You will then create several “Containers”. Containers will represent a set of tags you will use on a given website. Here, I suggest you to use the domain name of the website. In the following screenshot you’ll see how my containers are grouped under an “Elokenz” account.
For now, just create one account and one container.
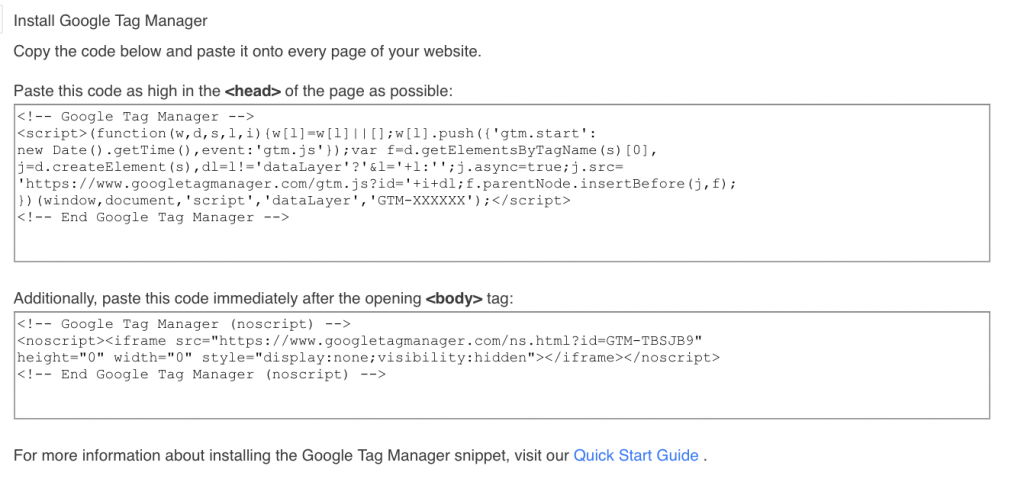
Install Google Tag Manager on your site
2 – Basic Google Analytics setup
If you already have Google Analytics installed on your site, then you can skip this section.
Now that you have GTM installed on your site, you can add many external services to your website without much trouble. Some official integrations have a deep and optimized relationship with GTM. This is the case with Google Analytics. The installation only require your GA tracking id.
Start by creating a GA account and property. Things are pretty straightforward here since it’s pretty similar to what you did with GTM.
- GA accounts are equivalent to GTM accounts
- GA properties are equivalent to GTM containers
So you should probably name your GA account as your company name, and your GA property as the website you want to track. Here is what it looks like for Elokenz:
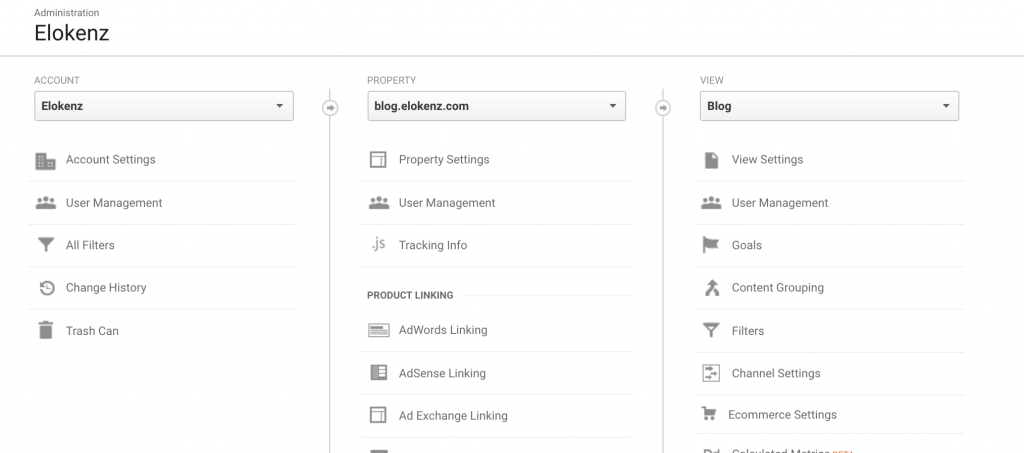
I’m not going too much into details here, but once you are done, you need to find and copy your GA Tracking ID. For that, got to “Tracking Info” section (under the “Property” column).
![]()
![]()
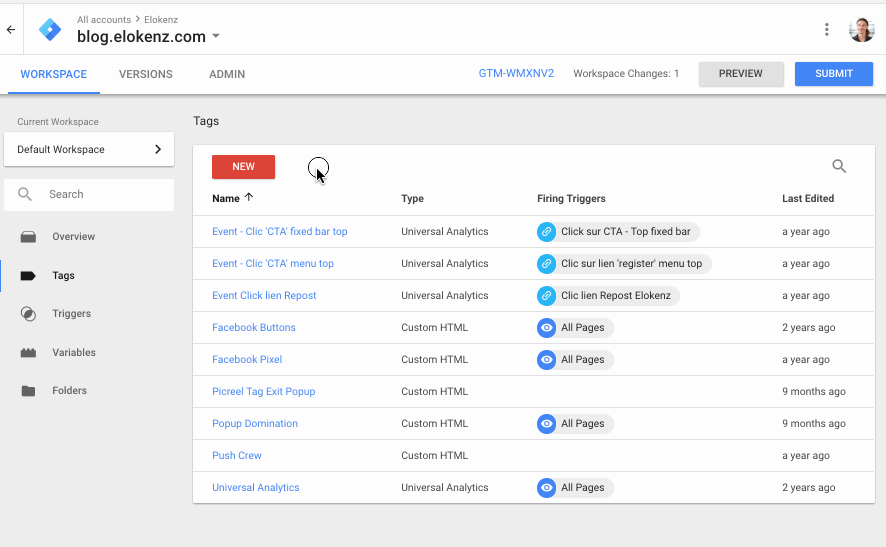
Copy this number, visit GTM and head over to the “Tags” section. This is where you will be adding new tags to your website. But wait, … before doing that we will save your Tracking ID as a variable (a piece of information that can be reused in several different containers later on).
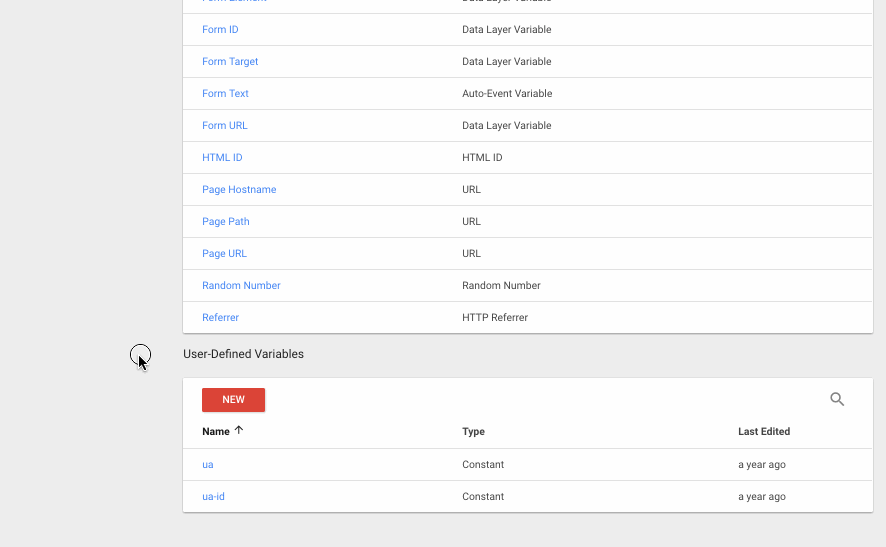
Click the “Variables” link on the left menu and add a “user-defined” variable. You will need to give it a name, specify that this is a Google Analytics Settings variable and fill in the GA tracking ID you copied earlier:
You are almost done. Now you need to add a tag for GA Universal Analytics. Click in the “Tags” section in the left menu, and a new tag. The configuration of tags in GTM is a three-steps process:
- Give this Tag a Name
- Select a partner tag or enter a custom code
- Decide when this Tag should be triggered (ie. on what pages or during what event)
We are therefore going to create a tag with the following properties:
- Name: “Google Analytics”
- Tag configuration: Universal Analytics (track page)
- Trigger: All Pages
Don’t forget to use the GA Tracking ID variable we created earlier when configuring the Universal Tag. Save the tag.
Once you are good, you should have 2 changes in your current container: a new variable and a new tag. These changes are not applied in production (to you live site) until you say so. So you need first to tell GTM that you are happy with your changes. To do that, hit the “submit” button on the top right area.
Now you should have a live working version of Google Analytics on your website… and you didn’t have to do any change on your server for that. Amazing!
3 – Track outbound clicks on your site
Alright, so, let dive into the interesting stuff (let’s be honest, you probably already had GA installed on your site). We are going to track all outbound clicks from your website. By outbound links, we’re referring to clicks that lead to external domains.
All will happen in GTM, so you don’t need much browser tabs open. First thing is to create a custom GTM trigger. A GTM trigger allows you to decide when and where to trigger a tag. Then we will create a GA-dedicated tag to save events in our analytics dashboard.
Click Trigger in GTM
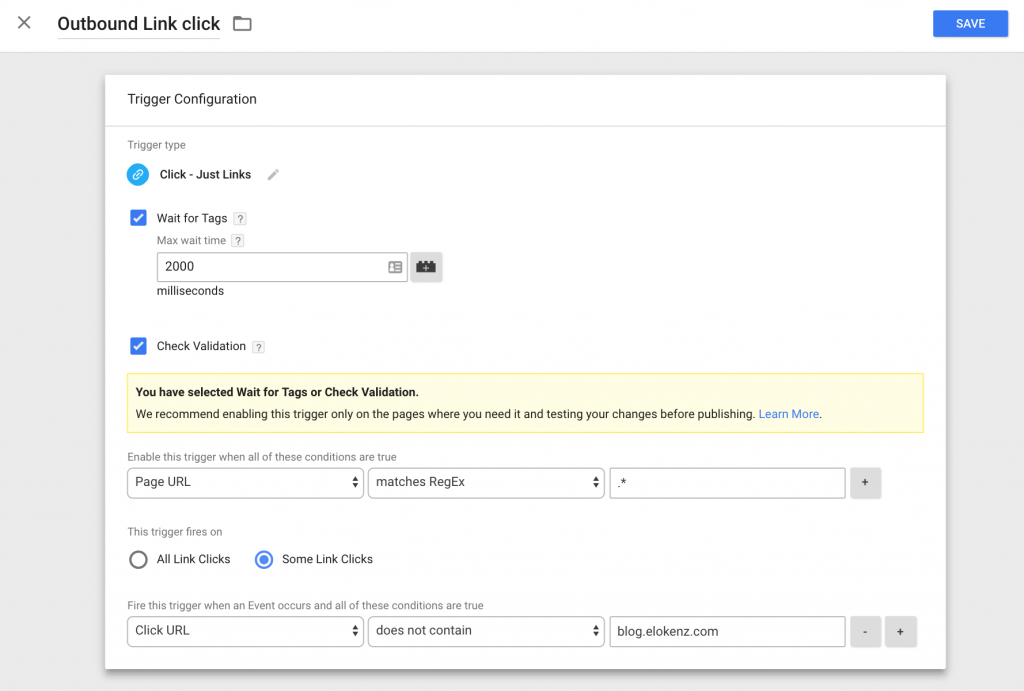
Click on the “Triggers” link via the left menu and then on “New”. Name your new trigger something like “Outbound Link click”. Then you’ll need to pick a trigger type, click on the central icon, then find the “Just links” type under the “Click” section.
Here are the settings you should use without further modification :
- Wait for tags (checked): 2000ms max
- Check Validation (checked): Page URL matches RegEx: .*
If we stopped here, your trigger will fire on any link clicked on your page. We need to filter internal clicks. For that, you need to add one more setting, and this time, you will need to adjust it for your personal case:
- Some link clicks: Click URL doesn’t contain “your.website.com” (replace here by your address)
Here is a summary of all these step:
Save it and we’re one step away from the end.
Outbound click tag in GTM
Good, let’s now go back to the “Tags” section from the left menu. We are going to create a new tag whose purpose will be to register a new event to GA when our “Outbound link click” trigger fires.
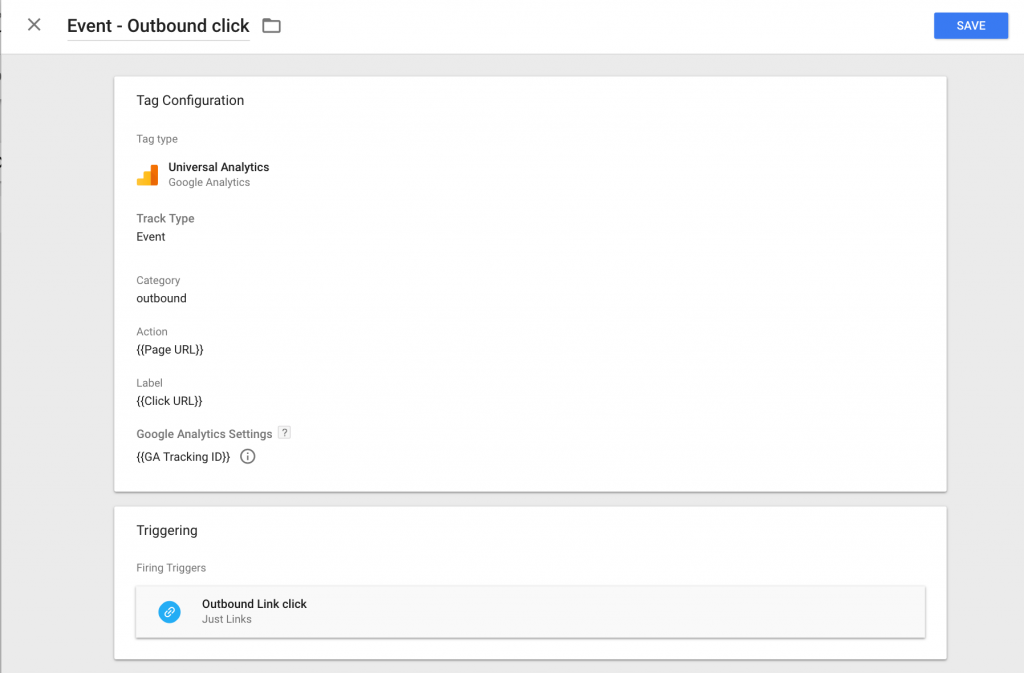
When configuring the tag, you will be able to select the event’s category, action, label and value. You’re free to enter what feel more adapted to your needs and I just give you a default
Create a new tag with the following settings:
- Name: “Event – Outbound click”
- Tag Type: Universal Analytics
- Track type: Event
- Category: “Outbound”
- Action: click the variable icon next to the input field and select “Page URL”
- Label: click the variable icon next to the input field and select “Click URL”
- Google analytics Settings: select GA Tracking ID
- Triggering: Outbound Link Click
Your configuration should look like the following:
The setup is now complete. You should now “Submit” changes: you need to enter a name describing the recent changes (and you can also add an additional note if you’re working with other people).
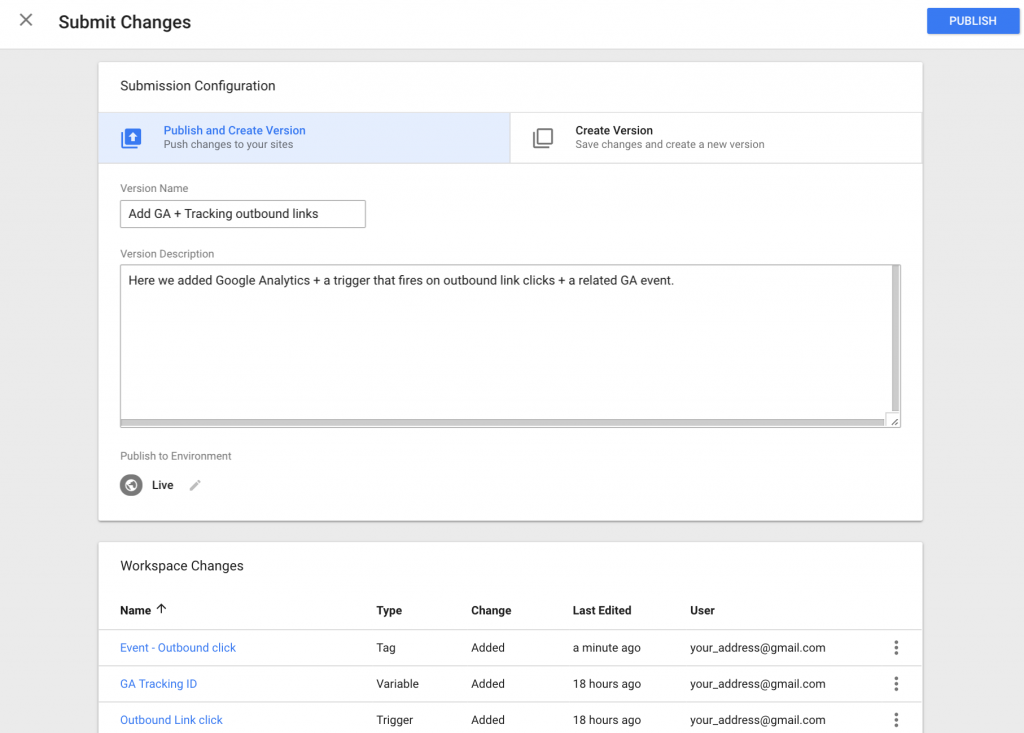
Hit Publish, and try to visit your site and click on few outbound links. Your Google Analytics Real Time view should reflect your new events.

That’s it for now. Let us know if you have any questions about the implementation.